|
|
|
![]()
INTAKE SYSTEMS
LAST UPDATE:
3/22/2001
![]()
INFORMATION TO
KNOW BEFORE MAINTENANCE
<Torque Specifications
(Print for reference)>
<View Cam/Crankchaft
Timing Marks>
Engine
Cylinder Firing Order
Rim
Compatibility List (Other Vehicles With Same Bolt Pattern)
U.S./Metric
Bolt, Hex Nut & Stud Classifiactions
How
to read Tire information
![]()
![]() RECALL
INFOMATION (1989-1999)
RECALL
INFOMATION (1989-1999)
![]() KNOWN
TROUBLE SPOTS!
KNOWN
TROUBLE SPOTS!
EMISSIONS
CONTROL SYSTEMS
![]()
Your
Car's Chemical Compounds!
The
Truth About OIL ADDITIVES!
By-Pass
type Oil Filters - Never change oils again?
|
|
![]() <Adijusting
Throttle Plate To Open 100%>
<Adijusting
Throttle Plate To Open 100%>
![]() <Adding
a Transmission Cooler> <See a picture
of it!>
<Adding
a Transmission Cooler> <See a picture
of it!>
![]() <Adding
K&N FilterCharger> - <Advanced Filercharger
kit> - <Air Raid System> - <Dual
Inlet K&N>
<Adding
K&N FilterCharger> - <Advanced Filercharger
kit> - <Air Raid System> - <Dual
Inlet K&N>
![]() <Replacing
OEM Horns With Air Horns> <See
a picture of it>
<Replacing
OEM Horns With Air Horns> <See
a picture of it>
![]() <Performance
Enhancements That Should Not Void MFG Warranty>
<Performance
Enhancements That Should Not Void MFG Warranty>![]() <Enhancements
that Will Void MFG Warranty>
<Enhancements
that Will Void MFG Warranty>
![]() <Recomendations><Stereo
Equipment Examples>
<Recomendations><Stereo
Equipment Examples>
<Idle Speed
Cut-off>![]()
|
|
 DISCLAIMER:
I will not be held responsible for any damages done to your vehicle when
performing any of the items listed on this page. These are
my opinion, and things I have done to my tracker, that may or may not work
on your vehicle. Any items you use here are done so at the sole dissgression
of the user/reader, and at their own risk. As always,
the person performing these additions, or modifications must possess some
mechanical skills, and must have an inclination for creativity.
Please check with MFG warranties, and your dealer to be sure these items
will not void any warranty you may have with the vehicle. Most
retailers for used cars will not honor the warranty once you make
modifications. Although this is not legal, and is treated like a
MFG warranty, they will use the modification or addition as an excuse to
not honor the warranty.
DISCLAIMER:
I will not be held responsible for any damages done to your vehicle when
performing any of the items listed on this page. These are
my opinion, and things I have done to my tracker, that may or may not work
on your vehicle. Any items you use here are done so at the sole dissgression
of the user/reader, and at their own risk. As always,
the person performing these additions, or modifications must possess some
mechanical skills, and must have an inclination for creativity.
Please check with MFG warranties, and your dealer to be sure these items
will not void any warranty you may have with the vehicle. Most
retailers for used cars will not honor the warranty once you make
modifications. Although this is not legal, and is treated like a
MFG warranty, they will use the modification or addition as an excuse to
not honor the warranty.
1. Locate gas pedal restrictor on floor.
2. Tighten in towards the floor until it won't
go any further.
3. Locate kickdown and throttle assembly on engine.
4. Loosen kickdown cable adjust nut so you can
turn it with your hand.
5. Adjust linkage (loosen) while applying pressure
to accelerator until the plate is straight up and down.
6. Tighten kickdown assembly to new setting.
This new setting will cause the trans. to kick-down
at its new setting. The throttle plate will advance a tad more when
you trigger the kick-down.
The kickdown cable is what was limiting the throttle
plate to open all the way. It may not make much difference to
a tracker equipped with oversized tires (215
to 235). However, I have been able to climb hills without kicking
down a gear (when it did before). You can
press the pedal all the way down, and get a feel for when it
kicks-down, then you know where to stop before
it does the next time.
The instructions you get with a cooler is very
vague. Fluid will leak all over the place while you are changing
the lines. The cooler should come with
some hose, and a coupler. This is in case one of the lines is too
short, you'll need to add a few inches or more.
Also, buy a quart of trans. fluid. This is so you can replace what you
leak, and for the additional small amount the cooler retains.
I used the "Through the Radiator, then cooler"
method, and did not have to use a coupler, but still needed the
hose it came with, and only about a foot and
a half if it. As soon as I get my digital camera back on-line, I'll
provide the installed product.
Read the instructions FIRST to prepare yourself with any adjustments and tubing preparations you may need.
1. Dress in old clothes that you can
throw away if needed.
2. Remove the grille
3. Locate where you want to place
the cooler (if using the through-radiator straps)
a. Bolt cooler
using brackets or other way you want it
Mounted it left side low, so the RETURN line would connect directly to
bottom of the cooler.
My rad. cooling lines are completely opposite each other, and the return
line is longer.
4. Jack front of vehicle up so you
can crawl under it.
5. Locate the transmission cooling
lines.
a. The "return"
line is the one that enters furthest to the rear of the transmission.
b. The "sending"
line is the one that is in front of the return line.
6. How do you want the trans. to
cool?
a. Through the
cooler only? (Steps 7 - 8)
1. You'll need more line and possibly another coupler (depending upon where
you mounted it)..
b. Through the
rad. first (stage 1 cooling), then cooler (stage 2 cooling)? (Steps 9 -
12)
1. Should only need the line included with the kit if mounted properly.
7. Remove the "sending" line from
the rad. and place it on the top most connector & clamp.
a. Always push
in firmly, while twisting back & forth so hose clears both flanged
edges, clamp goes between the flanges!
If the connector only has one flange, the clamp goes in front if it.
While
you're here, observe the color of the leaking fluid. If it's not
red or pinkish, you need to change it & the filter!
Don't get upset that fluid is leaking everywhere, you bought an extra quart,
right?
b. use your coupler
if you need more length.
8. Remove the "return" line
from the rad. and place it on the bottom cooler connect & clamp.
a. use a
coupler if you need more length
(GO TO STEP
13 )
9. Fasten the kit hose to the top
cooler connector (size it to the "return" line connector on the rad, add
2" to 2.5" & cut),
clamp, and let
it hang.
10. Remove the return from the rad. line
and place it on the bottom cooler connector.
a. Fluid
will start pouring on you, don't panic, is just smells!
While you're here, observe the color! If it's not red or pinkish,
you need to change it and the trans. filter!
11. Fasten the line connected to the top
connector, and place it on the rad. where you just removed the trans. line.
12. Fasten the trans. "return" line to
the bottom cooler connector & clamp.
13. Check for leaks
a. If you
used the cooler only method, remaining fluid will drain from the radiator.
14. Lower vehicle, remove jack.
15. Start engine, place in gear anc check
for leaks.
a. Have
someone sit in the car with the break on while in gear
b. Use the
ER Brake so the car does not move if you are doing this alone.
16. No leaks? Good, stop engine,
park, and put your grille back on, put jack away.
17. Leaks? Tighten clamps!
There should be no leaks if clamped properly
18. Put your grille back on, and put all
your tools away!
You're done!
[TOP]
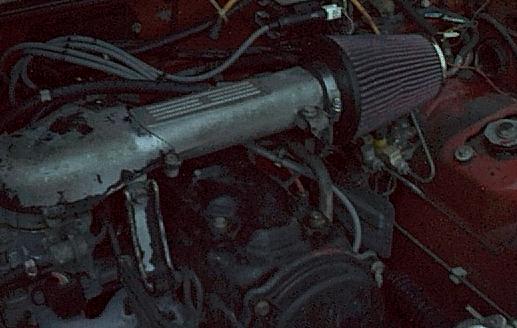

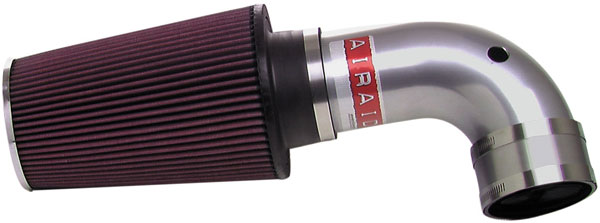
EFI and and some later model Trackers have Emissions Control Sensors on the air box, and removal is prohibited by the EPA.
This will mostly increase cruising gas mileage (45-55) high-end horsepower, better climbing ability, and better throttle response at high RPMs. Intake noise becomes quite audible, and can be loud at full throttle!
The filter may make contact with the hood, but
very slightly, and will not damage the filter. Mine does, but
also gets
more pressure because my Trans. mount is going
bad, and I have a bit of engine lean when accelerating from a stop.
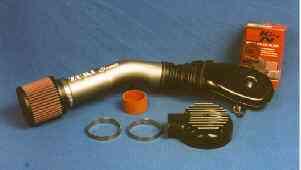
You can make your own Filtercharger injection
system if you know what you're doing. You'll have to look at
other systems in order to fashion your own.
You can do it, just takes a little time and engineering! You can
use
an existing kit (not a carburetor bolt-on) and
use a hose to connect between plenum and injector system. You will
have to find your own way to mount the unit!
You may be able to buy a system and fashion it
to your needs. I saw one for a L1 corvette motor! All I would
have to do is mount it somewhere, then use a hose to connect the injection
system to the plenum. It just looks way more professional
than just clamping a filter to the end of the
plenum. The hose length should not be too long, and use a firm hose
like the stock one if possible.
If you buy the Generation ][ kit (carburetor bolt-on),
you'll have to CUT the end off, because you can't mount that
to the carb. The generation ][ kits
have a cold-air chamber (like a scoop) that is attached to the plenum of
the
bolt-on kit. You can mount this where you
will "collect" air and inject it into the carb. through your existing plenum.
You then need to use a hose from the cut-off
point, to the plenum.
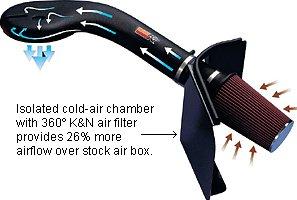
You can also add a hood scoop to let more fresh
air into the engine compartment (a small one). Channel the air towards
the
filter. If you place the scoop directly
in top of the filtercharger, you will get rain water in it. Offset
the scoop, and have
planes welded to channel the air towards it.
You have to cut a hole in your hood! Make sure you measure properly!
Note: Your AIR sensor is not in any way
connected to the plenum, or air-box (up to 1994)! You can use any
method to get the system installed without compromising EPA emissions standards!
That's what's nice about
having this plenum these trackers! I haven't seen a 95 or above intake
system, but if it's as simple as mine, this all will
work for you.
I have heard, and read the 1995 and later models to have EPA systems on
the air box. Do not remove the components
if you are required to have these items for any kind of inspection, or
emissions testing. This way you can hook up the
original system before taking it for these tests.
[TOP]
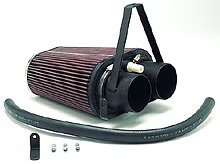
This is a dual inlet version of the con filter K&N offers. Don't know the part number, but it looks pretty good. I was thinking of a DUAL cone system myself, then I found this one.
1. Remove grille
2. Remove OEM horn.
3. Find a place to mount your Air Compressor.
a. On 1994, I used an existing
hole in the Radiator side mount, top left side.
4. You need a steel bracket to mount the
horns to.
a. I used a "holed"
flat piece of 1" steel, about 7" long.
b Mounted it to
the center post under the grille.
c. You can also use
the existing OEM horn bracket to mount the metal piece.
5. Space the air-horns evenly apart.
a. Some kits have up
to three trumpets, typical is two.
6. Measure and cut hose lengths, and connect
to Compressor & horns.
7. Connect OEM horn wires to compressor.
8. Change OEM fuse with 30amp fuse (circuit
that handles the horn).
9. TEST.
a. The only thing that can
go wring here is the polarity of the wires connected to the compressor.
If
the compressor is working, but no sound, reverse the wires.
10. Replace grille & your done!
These horns are VERY loud! I have a four
trumpet system, it was a three, but I added one that I had
from another system.
If you do not change the fuse, rapid multiple
hits will blow the fuse quickly! You will also loose your ability
to
shift from park if you pull over, because you
have to depress the break to release the lock-out for park. These
are
all on the same circuit.
You can use packages Relay, that will require
extra wiring, but will allow you to keep the existing fuse in the
circuit, because primary power for the compressor
will be from the battery. The relay only acts as a switch
when the horn is depressed, but power from the
battery passes on the other side of the relay, while the horn
power simply triggers the switch.
[TOP]
1. Install a set of Bosch or NGK Platinum Tip
Spark Plugs
2. Install a new set of wires, Magnetic Suppression,
7.5mm
a. I bought a set of MSW wires,
that were tested to allow more spark energies to the plug. You can
go to an auto outlet
and compare
plug wires, and make a choice (find the set for your make and model).
3. Replace stock exhaust with custom to 2.5"
or duals after the cat.
a. Kits are available from
other MFGs.
4. Use K&N RC-4160 Filtercharger (up to 1994)
a. Later models can use OEM
replacement filter (drop-in type, they are not filterchargers).
The following will void the
MFG warranty, and are professional enhancements
5. Replace OEM header pipe with true headers
6. Replace OEM Cam with performance CAM
a. Three types are available
for the "Samuri" 1.6, provide more valve lift & duration. Geo up to
1994 1.6 is the same engine.
I.
More valve lift & duration allows more air intake, and faster exhaust.
7. Replace carb. with weber carb.
8. Replace fuel-pump with higher capacity/velocity
type
9. Replace injector with larger injector
Other performance enhancements are available:
Supercharger & Intake/Carburator replacement
kits
[TOP]
I put Duralube in every year, with an oil change.
Do not put any engine treatment until you have at least 2k miles
in your vehicle! You could actually cause
damage to the engine, as the parts are still tight. The treatment
would make
them tighter, and is not recommended. I
waited till I had 16k, and my motor has shown very little signs of metal
wear & loss, with no carbon deposits in the
top-end.
I have also used Duralube in the Transmission.
I am not going to recommend this, because I do not know what has
caused my "lockup" clutch on the torque converter
to go twice. Treatments will prolong life, but the trans-cooler will
also.
[TOP]
Robert L. Borowski
C/O Trackersite on CDROM
219 Franklin Ave
Vandergrift, PA 15690
 Disconntinued
in 1999, when the name was changed to "Chevy Tracker."
Disconntinued
in 1999, when the name was changed to "Chevy Tracker."
![]() =
Latest Additions
=
Latest Additions
|
|
| Powered by TheGovernment.com |
|
||||||
|
|
||||||