|
|
|
This is very easy to do, and requires little or no mechanical experience.
OIL SPECIFICATIONS:
Manual Transmission Lubricant
API GL-5 SAE 75W-90 or 80W-90 GEAR OIL/LUBRICANT
Same specifications for Differentials, and Transfer case. Can use Synthetic, or blend.
On each of the units, there will be two plug locations, a fill/check plug, and a drain plug. The one closest to the ground is always the drain plug.
Checking the Oil Level?
If you open the fill plug, and oil immediately spills out, the oil
level is ok, immediately put the fill plug back in and tighten.
If none spills out, you can check the inside with your index finger.
The oil level should be even with the bottom of the fill hole.
Here, you can top-off the oil, but you should completely change it
anyway if you haven't done so the past 50k miles.
Changing the Oil:
With the engine, and transmissions cold, remove the fill plug first
(any unit), then remove the drain plug. Make sure you have something to
catch the oil, you don't want it all over thr ground. By removing
the fill plug first, will allow the oil to completely drain out of the
unit.
![]()

MANUAL TRANS: 1. Drain 2. Fill/Check.
TRANSFER CASE: 1. Fill/Check 2. Drain
Once the oil is drained, you have one of two choices here, first,
you can fill it up, run the vehicle a mile, drain, and fill again.
This will make sure you have REALLY cleaned out the unit. Do this
if you drive under rough conditions (4x4ing, lots of hills, and lots of
"start-stop" driving). Second, simply put the drain plug back in,
and fill.
If you observe large metal chips, you may have gear damage. It is normal to see metallics in the oil, sort of like how metallic paints look? If the metals are larger than that, have it checked by an auto shop.
Always fill to the bottom of the fill hole. If the rear of the car is jacked up, filling will cause oils to spill out once the vehicle with the fill plug out. This is nor a problem, and will allow for better checking later, since more will be in there, and when you check oil level later, it should spill out (if level).
Oil always expands when it's hot, so, even if you fill to the bottom of the fill hole, lower the car, and let the oil spill to level, opening it again HOT may cause some so spill out again. This is why you always check and fill when the units are cold.
Specs: Dextron II or III automatic trans. fluid, about three pints, but buy three bottles of fluid
This requires that you remove the pan, there is no check or drain plug! You shouls have some mechanical skills to prepare you for any surprises. You will also need to get a new gasket, you can't use the one after you remove the trans. pan.
1. Have large basin to catch the trans oil, from the front of the trans
pan..
2. Remove the bolts up front, and on the sides of the pan first, then
loosen the raer 4 turns..
The idea here, is to remove these first, so we can
loosen the rear, so the pan opens on an angle!
Use a crewdriver to pry the pan open.
3. Once you have got the pan OPEN at one end, let the trans fluid drain
into the basin.
![]()
4. Lossen more bolts and let the pan hang as far down as you can, so
the most fluid can drain.
5. Once all fluid has stopped, you'll have to drop it out completely,
remove all bolts, while holding the pan
so it does not fall.
6. Once the pan is off, pour all the remaining oil out of the pan.
You're supposed to use a sovent to clean, then compressed
air to dry.
Remove any gasket material left on the Pan
or Trans surfaces.
7. Inpect the pan's magnet for metal filings. Filings are normal,
shavings are ok, but slivers are bad.
If you have excessive metal shavings and filings,
you're trans may need serviced or replaced.
8. Clean the magnet of any metallic parts, clean the pan of any sudge,
and put the magnet back into the pan.
If your pan does not have a magnet, then it wasn't
designed for it.
9. Once the pan is empty, use apply a small thin layer of grease along
the pan edges (where the gasket goes).
10. Place the gasket on, and line up with the holes.
11. Position pan on trans, and place bolts in by hand, to position
pan for final tigntening.
12. Hand tighten all bolts as much as you can, so pan is now fully
bolted to the transmission.
13. Now you can use your wrench to tighten all the bolts, start with
the corners, and work your way in center.
Do not over tighten, you do not want
to damage the new gasket.
14. Once all tight, fill the trans with two of the bottles of Dextron
III trans fluid.
15. Start vehicle, and place in drive till the trans grabs, then run
through all other gears.
16. While in neutral, check trans fluid level, and top off.
17. Check for leaks from the pan gasket!
18. No leaks, you're all done
If your PAN leaks, you may need to tighten it up more. It is hard to judge just how much to tighten the nolts before actually damaging the pan gasket. Always make sure the vehicle is off while tightening.
The reason you line the pan lip with grease, is not only to help place the pan gasket so it will stay while lining up, but works similar to using silicone (RTV) on your valve cover gasket. Except, you can't use it here, because the trans. is high pressure, and if any RTV gets into the trans, you will damage it.
This is very simple, and is a no brainer.
You need: 4.7 QUARTS OF SAE 10W30 MOTOR OIL & REPLACEMENT FILTER
Here is a chart for oil specifications:
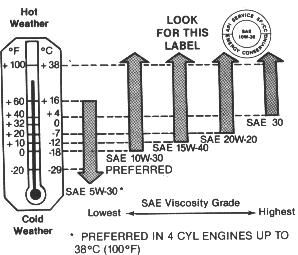
However, if your engine has over 100k miles, I used 10W40. The thicker oil helps keep a thicker barrier (for worn out main bearings) between the crank, and bearings. Same with the cam, they all wear out, and using a thicker oil helps more than you may realize.
Also, using SLICK-50 for engines with over 100k helps also. The teflon bonds to the metal, and you get that extra molecular layer of thickness. . . Sounds stupid I know, but It's helped me in the past. My cars have fallen apart before the engine would go bad. This also helped one day when I blew an oil seal, and drove two miles with NO OIL! The SLICK-50 was all that saved the engine. It cost me 200+ for new seals, and I drove the car for another year!
I have also used Castrol 10W-30 Syntec at 79k miles for my Tracker,
this was done on 2/13/2000, and I added one
quart of Duralube with 4 quarts of Syntec. The tracker holds
4.7qt of oil, however, I used a Syntec 3600 filter, which is twice as long
as the OEM filter. This is like using a high capacity filter, and
has no adverse effects on the engine.
To begin, The vehicle must be level, or, better yet, jacked up in the rear so oil runs to the front of the pan better.
Remove the oil cap from the valve cover.
The oil pan has a drain plug, so you can remove the drain plug, and
let the oil spill into a basin.
Once all the oil stops, remove the oil filter. Most of the time,
you can remove the filter by hand, and they are only to be tightened by
hand. Lower the car back down to the ground when the oil stops.
Using FRESH oil, dab your finger in it and apply a small layer to the rubber seal on the filter, in a circular motion. This is so the engine heat does not cause the seal to stick to the engine. HAND TIGHTEN! You can give it some elbow grease here, you can't relly over tighten by hand.
Once the filter is on, put the drain plug back in, and tighten with the wrench.
Fill the engine with oil, replace the cap and start the engine. If the OIL light does not go off, I think you forgot to put the filter back on (I took my plymouth to a 10minute lube, and this happened, that was in December of 1999, those idiots!)
Shut the car off, and check oil level, top off if needed.
You're done!
Most places charge more than $17.00 for the oil and filter. If
you already have tools, and a basin, the cost to you can be about $12.00
to $16.00 for the oil and filter. If you buy a case, it's cheaper
per TWO oil changes. The first one may cost 24.00 because you bought
a case, but the second wil only cost you the price of the filter.