|
|
|
Disclaimer: This is what I did to fix the problem, and, if not done correctly will not fix yours. You do this replair at your sole disgression, and will not hold me, or any contents herin responsible for any conditions that worsen afterwards. Pay close attention to what is written, and perform the repair at your own risk. You should have some mechanical knowledge, and skils before performing any repairs on your vehicle.
Purchase a NEW O-RING if you do not want to use Permatex gasket maker! Parts stores such as Advance Auto, carry many sized O-rings. You will have to either measure one up, or get it from the dealer. This repair is NOT all that difficult. If using an O-ring, I suggest using indian-head to complete the seal when mating the surfaces. . .
IF Using Permatex (gray), make sure it specifies it is oil resistant, and can withtand tempuratures up to 600-degrees farenhiet (though 400 would do. . .) You can use your own method of making a gasket, as long as you feel it will work.
1. Remove the bolt that has any wires grounded to the distributor,
and set aside. This bolt is the smallest of the four.
2. Remove the Cap, keep all plug wires attached, and move aside.
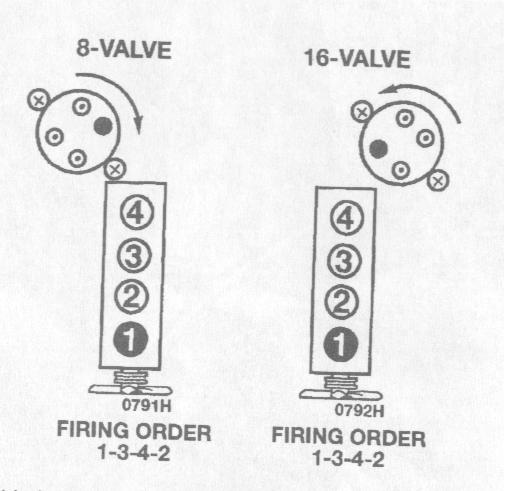
3. REMEMBER where rotor is positioned!! Or crank the engine
until piston #1 is at TDC (See fire-pattern)
(Mine was between 3&4 when I did mine)
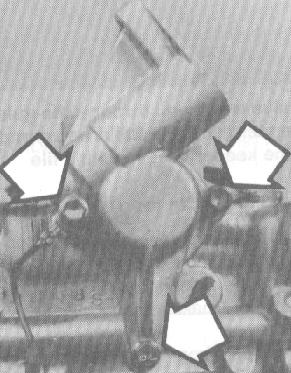
4. Remove the three bolts that hold the distributor housing onto
the engine head, and block, and remove.
Remember where the longest one goes, the other
two should be the same size. Set them up to where you
can reach them easily, while one hand is holding
the housing in place. The picture shows the locationsd below,
but your gound(s) may be attached elsewhere.
This picture if the housing is also shown with the head, and distributor
removed. The bolt locations are the
same.
5. Remove the distributor housing. Some oil will spill out
onto the transmission bell housing.
6. Look at the mating surface of the housing. The black
ring is where the original O-ring is now smashed
into the housing, and is difficult to pry
out. Also, notice the SLOT, this is the key for the housing, and
can only
be installed one way. Notice the Cam
gear, and Distributor gear, how they are CURVED.
7. Clean the mating surfaces of both the engine (first), and
distributor housing (second, after you get all the oil out
of it).
8. If using a new O-ring, replace the old one with the new, apply
thin coat of indian-head, then skip to step 11, or continue on.
9. Using permatex, or simiar "gasket maker" as specified, apply
the gasket maker to the entire mating
surface of the distributor housing.
Since the cam center area is raised slighly, you should not get any inside
the cam gear
area, if you do, it should not harm anything,
it will either get in the filter, or come out of the pan with your next
oil change.
This happened to me at my last oil change,
left over scrapings from the valve cover gasket were in it.
10. Let sit for 10 minutes, or as so it is elastic, but not to gooey.
11. Now, this is the hardest part! You have to line up the rotor position,
by turning it back (counter clock-wise for 8valve,
clockwise for 16valve) some, so when
the housing is put back on, it moves into the position originally in when
removed (took me three tries!!) because
of how the gears are curved.
12. Once you're positioned, hold the housing on, and replace the bolts
that hold the housing onto the engine, hand tighten
until you can't tighten anymore, then
use your socket wrench to snug it.
13. Once you see the gasket squashing out of the mating surfaces, and
the housing is firmly in place,
continue to tighten with a torque wrench
to 7.5', starting with the top two, then the bottom. If you do the
bottom first, you
may off-set the housing, it will lean
back towards the fire-wall (or as the manual says; bulk-head).
14. Replace distributor cap.
15. You must let this cure over-night! DO not attept to start
the vehicle now! The gasket must cure.
16. Next day, start 'er up and see what happens. It can't be
any worse than it was. You may have to time the
engine slightly, but I didn't have to.
17. Keep an eye on the seal for the first 200 miles, if no leaks are
present, it should hold for a while.